
Do you Really need a Snowflake Database Administrator or DBA?

In a previous article, I questioned whether the Snowflake Database Administration (DBA) role was becoming extinct, only to conclude that on Snowflake, the role was evolving to achieve more work with less effort.
In this article, I’ll explain how the Snowflake roles and responsibilities of a DBA have changed and highlight some of the most essential tasks of any Snowflake DBA or Snowflake Administrator.
Virtual Warehouse Management
One of the single most important tasks of a Snowflake DBA is to deploy, right-size, and manage Snowflake virtual warehouses.
Unlike traditional on-premise database platforms like Oracle or SQL Server, which require fixed, pre-installed hardware, operating systems, and database software, Snowflake can provision a cloud-based Virtual Warehouse within seconds. This provides Snowflake admins with the flexibility to deploy, resize, or suspend compute resources within seconds while only paying for the actual time used – charged by the second. This compares well to on-premises platforms, where hardware and software deployment typically took weeks or months and resizing the hardware even longer.
create warehouse prod_sales_vwh with
   warehouse_size      = 'SMALL'
   min_cluster_count   = 1
   max_cluster_count   = 4
   auto_suspend        = 60;
The SQL Statement above illustrates how easy it is to deploy a SMALL-sized warehouse, which means moderately complex queries will be completed quickly while automatically setting the number of clusters to scale out to accommodate more concurrent queries. All this can be executed on the production platform without service interruption, and the whole process is completed within milliseconds.
Snowflake Admins also have the option to instantly increase warehouse size to process greater data volumes or more complex queries. The SQL statement below demonstrates the method.
alter warehouse prod_sales_vwh set
   warehouse_size = 'LARGE';
The diagram below illustrates what happens when a Snowflake administrator alters the warehouse size, in this case, from a SMALL to a LARGE warehouse size.

However, as I have indicated before, because deploying additional compute resources is effortless, many Snowflake database administrators risk significant, unexpected overspend due to poor virtual warehouse deployment.
Take, for example, the simple SQL statement below, executed by a UK-based Snowflake customer who quickly ran up a bill of over $120,000 in just a few days.
create warehouse test_vwh with
   warehouse_size    = 'X3-LARGE'
   min_cluster_count = 8
   max_cluster_count = 10
   auto_suspend      = 0;
The above statement deployed a virtual warehouse with a cluster of 64 nodes running 512 CPU cores. While this is a vast machine, the risk was further compounded as it was deployed with a minimum of eight clusters, consuming 512 credits per hour. To make matters worse, when the first query was executed, the entire cluster started, deploying 4,096 CPU cores and (assuming a credit rate of $3.00 per credit) charged a total of $1,536 per hour without the option to suspend automatically once the last query finished executing.
Just 24 hours later, the cluster of over 500 nodes ran up a bill of almost $37,000 and continued for three days before anyone noticed. As you might expect, the person responsible is no longer working at that Snowflake site, and it’s a warning to every Snowflake DBA - be careful when deploying virtual warehouses.
However, this leads to one of the most critical responsibilities of any Snowflake DBA: they must become an expert on Snowflake Cost Optimization to ensure they get the very best out of this amazing technology.
Snowflake Cost Optimization
The best practices to achieve a cost-efficient Snowflake deployment include:
Deploy and size warehouses depending on the size and type of workload executed. Avoid creating additional warehouses for each new data processing pipeline, but combine similar workloads on the same virtual warehouse to maximize efficiency.
Don't assume that every query or batch job must be completed as quickly as possible. Be aware of the need for batch transformation jobs to maximize throughput rather than minimize latency. Execute lower priority batch tasks on the same virtual warehouse and set the MAX_CLUSTER_COUNT to a suitable value and SCALING_POLICY = ‘ECONOMY’ to balance the need to maximize throughput, avoid excessive queuing while optimizing spend. This deployment queues queries for up to six minutes before scaling out and prioritizes warehouse utilization over latency.
For end-user workloads where low latency is critical, deploy a warehouse with a suitable MAX_CLUSTER_COUNT and set the SCALING_POLICY to ‘STANDARD’. Avoid setting the MAX_CLUSTER_COUNT to 10 (or higher) while the SCALING POLICY is STANDARD unless maximizing performance by eliminating queuing is a much higher priority than controlling cost.
While Snowflake spilling to storage should often be avoided, don't assume that query queuing needs to be eliminated at all costs. While it's true that queries will be queued when the warehouse is overloaded, it also indicates your virtual warehouses are fully utilized, implying a lower overall cost. If your queries finish within an acceptable time, queuing is not necessarily a problem.
Only set the AUTO_SUSPEND to zero if you are confident you are aware of the potential risks of continuous warehouse operation and take steps to suspend warehouses when they are no longer needed.
Set a STATEMENT TIMEOUT IN SECONDS for every warehouse based on the warehouse size to limit the risk of overspending on an individual query. In one case, a DBA accidentally ran a $150,000 bill during a weekend when they ran a Cartesian join query on an X4-LARGE warehouse with the default STATEMEMENT TIMEOUT of two days.
While it’s helpful to understand how the Snowflake Caches Data, DBAs should largely ignore this feature. In my experience, the Snowflake cache works in the background to improve query performance. You cannot control the extent to which data is cached, and it's therefore best ignored.
Be aware of some advanced Snowflake tuning features, including Snowflake Cluster Keys, Query Acceleration Service, and Search Optimization Service. While these Snowflake advanced performance features do include some risk if deployed inappropriately, they can also accelerate Snowflake query performance and, in some cases, reduce cost.
Finally, as with every Snowflake Data Engineer, DBAs need to understand the best practices for Snowflake Data Engineering and be an expert in Snowflake Query Tuning.
Backup, Recovery and Test Environment Deployment
“Nobody needs to perform a backup. You need to be able to recover from data corruption”
DBAs are well-versed in the vital importance of database backups, but nobody needs to perform a backup. In reality, you need to be able to recover from data corruption. Yet, in traditional on-premise databases, a backup can take hours or even days to complete and a restore operation even longer.
However, don’t assume you need to extract data from Snowflake to external cloud storage to perform a backup. Each time data is written to cloud storage, it’s automatically replicated to two other data centers with an underlying resilience of 99,999999999%. Extracting data from Snowflake takes a copy of the data to the same servers, making it harder to restore.
Using a combination of Snowflake Zero Copy Clones and Time Travel, it’s possible to freeze a clone of the production database as it was up to 90 days ago and quickly recover from data corruption with a few simple SQL statements.
Even better, on Snowflake, you can take an instant backup of a table, schema or entire database and use it to provide a fully read/write set of data for testing and development.
create database prod_backup
    clone prod_db at (offset => -3600);

alter database uat_db
    swap with prod_backup;
The above SQL statements takes a backup of the PRODUCTION database as it was an hour ago and then restores it to a User Acceptance Testing (UAT) database ready to perform tests. The entire operation took a few seconds.
The steps include: -
1. Create a Zero Copy Clone: Unlike a traditional backup, which takes a physical copy of data, perhaps taking hours to complete, the zero-copy clone replicates the meta-data, including pointers to micro-partitions. For a multi-terabyte database, this typically completes within a few 60. Furthermore, the offset option creates a transactionally consistent snapshot of the data as it was an hour ago.
2. Swap Database: This effectively swaps between an existing database and a clone copy. This takes milliseconds to complete.
By default, any data changes to a permanent table are maintained for 24 hours, although, on the Snowflake Enterprise Edition, this can be extended by up to 90 days.
The Snowflake Time Travel documentation details how this remarkable feature works. The DBA must, however, establish a sensible time limit to take database clones and agree on a realistic retention period to avoid excessive data storage bills.
The same Snowflake customer who accidentally spent $120,000 in three days also deployed the entire production database with 90 days of time travel. The 350 GB of actual storage quickly ballooned to several petabytes with a correspondingly high storage bill.
On a visit to another customer, I noticed that excessive use of cloning led to an unexpectedly high Snowflake storage cost. Effectively, the DBA (quite correctly) used cloning to deploy test environments for the data engineering and test teams but forgot to remove these afterward, assuming these were always zero storage costs. In reality, update, delete, or merge operations on the cloned data results in new micro-partitions being created, but clones retain the old versions, which will never age out and therefore never removed.
As explained in my article on Snowflake Cloning and Storage Cost, the customer quickly saved thousands of dollars in storage by dropping clones over six months old.
Management of DEV, Test, and PROD databases
The diagram below is taken from the article Agile Snowflake Data Management and explains how DBAs can use Zero Copy Clones to manage the Software Development Lifecycle (SDLC) process.
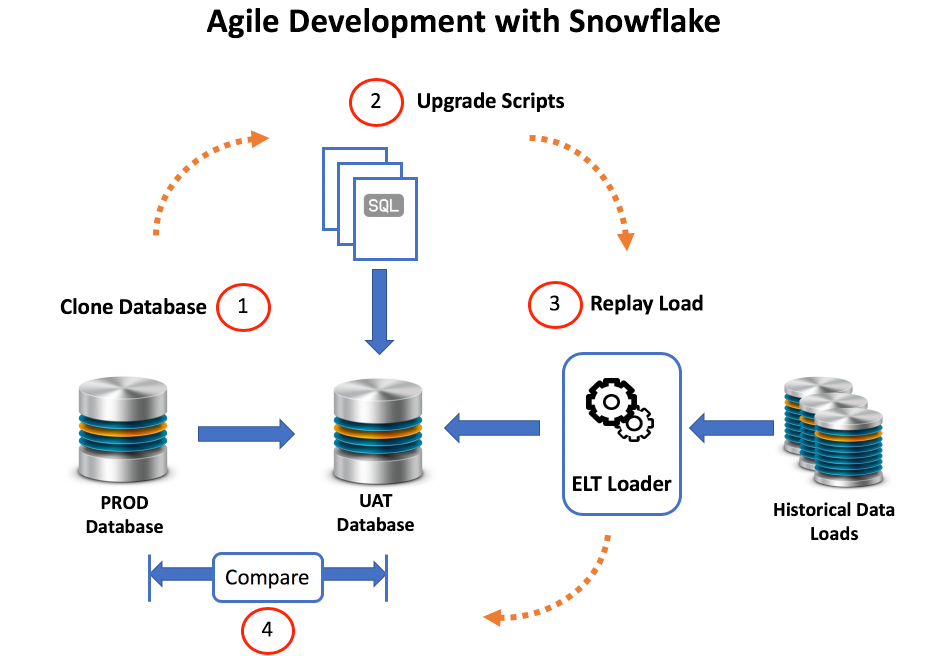
The steps to produce a full-size test database, ready to accept inserts, updates and deletes are as follows: -
Clone Production: To produce a User Acceptance Testing (UAT) database copy. This will clone database as it was several days ago to support replaying historical data loads.
Apply Database Changes: To create the new and modified tables ready for testing.
Replay ELTL Loads: This involves re-executing the ingestion process against a known starting point. This applies changes for the past seven days, effectively replaying the past week's load against the new design.
Compare Results: This compares the existing production database with the new version. The only differences should be as a result of the upgrades and changes.
Using this method, DBAs can ensure all development and testing is executed using real live data, and once tests are complete, the entire system can be restored within minutes.
Performance Monitoring and Tuning
While it’s often possible to improve performance by simply increasing the virtual warehouse size, there's a risk of poorly written, inefficient SQL queries and potentially poor performance and higher cost.
Snowflake DBAs are, therefore, advised to become experts in SQL performance tuning in addition to controlling Snowflake cost.
The traditional Production DBA role often involves an intimate understanding of the database management system, with the ability to tune hundreds of parameters controlling buffer pools, memory cache sizes, and physical data placement. On Snowflake, these tasks are no longer relevant, but the role of the Development DBA remains.
This means the DBA will need to better understand the database design, application architecture, and SQL tuning in particular.

The screen-shot above illustrates the web-based Snowflake tool used to list executed queries. It shows every query executed, including the start, end time and duration. In addition, clicking on any SQL statement reveals a graphical image of the query profile which is illustrated in the screen-shot below.

Using the query profile above indicates that step [15] is one of the most compute-intensive tasks, which takes nearly 17% of all effort, and is, therefore, a potential target for tuning by reducing the amount of data scanned.
Finally, the option exists to drill down further to reveal additional statistics about the query as illustrated in the screenshot below.

Analyzing the statistics above reveals that around 93% of the execution time was spent reading data from a remote disk (Amazon S3 in this case), which scanned over 40% of the underlying data. The designer should consider eliminating rows using pruning with additional query filters or deploying data clustering or Search Optimization.
The Snowflake Information Schema includes additional information, having over 20 views, and several Table Functions used to analyze system performance, including options to monitor Snowflake spend and data storage usage.
Tracking Queries using Snowflake Query Tagging
Finally, it’s possible to quickly identify and isolate all queries associated with a given job, for example, a Data Transformation process. Using the Snowflake Query Tag marks every query in a given session, which can then be used to filter results in the QUERY_HISTORY view.
alter session
   set query_tag = 'DATA_TRANSFORMATION_ABC123';
Using the SQL command above, every subsequent statement executed in the session is marked with the tag DATA_TRANSFORMATION_ABC123, and the SQL can be subsequently identified and analyzed. The DBA could use this method to tag parts of the application and use this to identify performance changes before they are promoted to production and proactively avoid performance issues.
This means (for example), using the following SQL, a DBA could track the job elapsed and execution time along with the rows processed per second - a useful metric to help identify when performance has significantly improved or degraded.
select session_id
,      to_char(min(start_time),'DD-MON-YYYY HH24:MI:SS') as session_start
,      to_char(max(end_time),'DD-MON-YYYY HH24:MI:SS')   as session_end
,      round(sum(total_elapsed_time)/1000) as total_elapsed_secs
,      round(sum(execution_time)/1000)     as total_execution_secs
,      total_elapsed_secs - total_execution_secs as total_wait_secs
,      sum(rows_inserted) + sum(rows_updated) + sum(rows_deleted) as rows_processed
,      round(rows_processed / total_elapsed_secs) as rows_per_sec
from snowflake.account_usage.query_history
where query_tag = 'TRANSFORMATION_JOB_ABC123'
group by all
order by session_id;
The screenshot below illustrates the output of the above query, which lists the results of a job that was executed three times.

Notice the TOTAL ELAPSED TIME is around 230-275 seconds for the first two executions, but this is reduced to just 83 seconds on the third run? We can confirm this was not simply the result of processing smaller data volumes as the average ROWS PER SECOND processed was increased to 1.8m rows compared to as few as 171,000 per second.
The difference becomes even more apparent, as illustrated below.

In this example, the improvement resulted from a database design and code change, but equally (and probably more importantly), this method could highlight a sudden unexplained reduction in query performance, which needs to be investigated and resolved.
The DBA Role has Evolved
Traditionally, the DBA role was split between the Development DBA, embedded with the design and development team, and the Production DBA, responsible for system tuning, backup, and management of the production systems, with little or no understanding of the underlying applications.
Snowflake has simplified or eliminated routine database management and planning, so the DBA role has evolved. Now, a single DBA can manage more extensive, complex Snowflake deployments, with many tasks fully automated or managed by Snowflake.
Likewise, the Development DBA role has been streamlined. There’s no physical data placement, partitioning, or index management, and the Development and Production DBA roles may be combined. The roles can be merged entirely on smaller systems, and the production DBA must be more closely aligned with the design and development role.

In summary, no, the role of the Snowflake DBA is not facing extinction, but it really has evolved into a much more rewarding and interesting job. There really never has been a more exciting time to work as a database admin, especially on Snowflake.
Notice Anything Missing?
No annoying pop-ups or adverts. No bull, just facts, insights, and opinions. Sign up below, and I will ping you a mail when new content is available. I will never spam you or abuse your trust. Alternatively, you can leave a comment below or connect on LinkedIn and Twitter, and I’ll notify you of new articles.
Disclaimer: The opinions expressed on this site are entirely my own and will not necessarily reflect those of my employer.

John A. Ryan